Welcome to the ultimate guide on building your very own agility course right in your backyard or living room. If you have ever watched an agility competition on television and thought about how incredible it would be to see your own dog zoom through tunnels, leap over hurdles, and weave between poles, you are in the right place.
You do not need an expensive membership to a professional training facility, nor do you need a massive budget. In fact, you can create a fantastic, safe, and highly effective playground using everyday household items and simple materials from your local hardware store.
This guide is designed for beginners of all ages, whether you are a teenager looking for a fun after-school project with your family dog or an adult wanting to give your furry best friend some healthy exercise. Let us dive into the wonderful world of canine fitness and learn how to construct a home course from scratch.
Understanding the True Spirit of Agility Training
Before we grab our tools and start building, it is vital to understand what agility training is truly about. At its core, this activity is a team sport where you and your dog move together through an obstacle course. You act as the coach, using your voice, body language, and hand signals to guide your teammate through a specific sequence of challenges.
Physical and Mental Health Benefits
Agility is not just about burning off physical energy, though it certainly does that. It is a full-body workout that improves your dog’s balance, coordination, flexibility, and overall strength. Just like human athletes, dogs need to exercise different muscle groups to stay healthy and prevent injuries as they grow older.
Equally important is the mental workout. Navigating an obstacle course requires immense focus and problem-solving skills. Your dog has to listen closely to your commands while figuring out exactly where to place their paws. This mental stimulation is highly satisfying for animals and can significantly reduce unwanted behaviors at home, such as chewing on shoes or barking out the window due to boredom.
Strengthening Your Relationship
The greatest reward of this training is the deep bond that develops between you and your pet. To succeed, your dog must trust you completely. When they hesitate before an obstacle and look to you for encouragement, your positive reinforcement builds their confidence. Over time, you will notice that your dog pays much closer attention to you during everyday life, making regular obedience training much smoother.
Safety Measures and Ground Rules
Building a course is incredibly exciting, but safety must always be your top priority. Dogs can get injured if equipment is poorly made or if they are pushed to do too much too soon. By setting a few ground rules, you can ensure that every training session remains joyful and injury-free.
Assessing Your Dog’s Fitness Level
Not every dog is built for intense jumping and sprinting right away. Young puppies whose bones and joints are still developing should never jump over high hurdles, as this can cause long-term damage to their growth plates. Similarly, older dogs or breeds with long backs and short legs, such as Dachshunds, require extra care to protect their spines.
If your dog is carrying extra weight or has been mostly a couch potato, you must start very slowly. It is always a smart idea to consult with a veterinarian before beginning a new fitness routine to ensure your pet is physically ready for the challenge.
Creating a Hazard-Free Environment
Where you set up your course matters immensely. If you are working outdoors, look for a flat, grassy area that is free of holes, rocks, hidden tree roots, and sharp sticks. Slipping on wet grass or tripping in a hidden ditch can cause painful sprains.
If you are training indoors on a rainy day, avoid slick surfaces like hardwood, tile, or laminate floors. Dogs can easily slide and injure their joints when trying to turn quickly. Instead, set up your obstacles on a large area rug, a carpeted room, or interlocking foam gym mats to give your dog’s paws plenty of traction.
The Golden Rule of Knock-Down Obstacles
When building jumps and hurdles, you must design them so that the horizontal bar falls out of place instantly if your dog bumps into it. Never glue or securely fasten the jumping bar to the stands. If a dog misjudges a jump and hits a solid, unyielding bar, they can suffer a nasty fall or a painful bruise. A bar that drops away effortlessly ensures that mistakes only result in a minor do-over rather than a trip to the vet.
Essential Tools and Materials for Your Homemade Course
You do not need a garage full of professional construction tools to build a fantastic course. Many items can be found right around your house, while others can be purchased cheaply at a local store. Let us look at the basic materials you should gather.
Everyday Household Items
Look around your home for items that can be repurposed for training. You will be amazed at what you can find.
- Plastic laundry baskets or sturdy cardboard boxes to act as jump supports.
- Brooms, mops, or long wrapping-paper rolls to serve as jump bars.
- Old bedsheets, large blankets, or pop-up children’s play tunnels.
- A sturdy wooden kitchen step-stool or a flat sofa cushion.
- Empty plastic soda bottles or orange traffic cones from your garage.
- A non-slip bathmat or a small piece of outdoor carpeting.
Simple Hardware Store Finds
If you want to build something a bit more durable that can withstand the outdoor weather, a quick trip to the hardware store will provide everything you need.
- PVC pipes, which are lightweight white plastic tubes used for plumbing. They come in various thicknesses, but a three-quarter-inch diameter is usually perfect for most dogs.
- PVC connectors, including T-shaped joints, elbow joints, and end caps to snap your pipes together.
- A simple hand saw or a specialized PVC pipe cutter, which slices through plastic like butter.
- Heavy duty plastic zip-ties for securing items without using dangerous nails or screws.
- Brightly colored duct tape to add visibility and style to your creations.
How to Build and Teach the Hurdle Jump
The hurdle jump is the classic centerpiece of any agility course. It teaches your dog to launch themselves into the air gracefully and land safely on the other side.
Step-by-Step Jump Construction
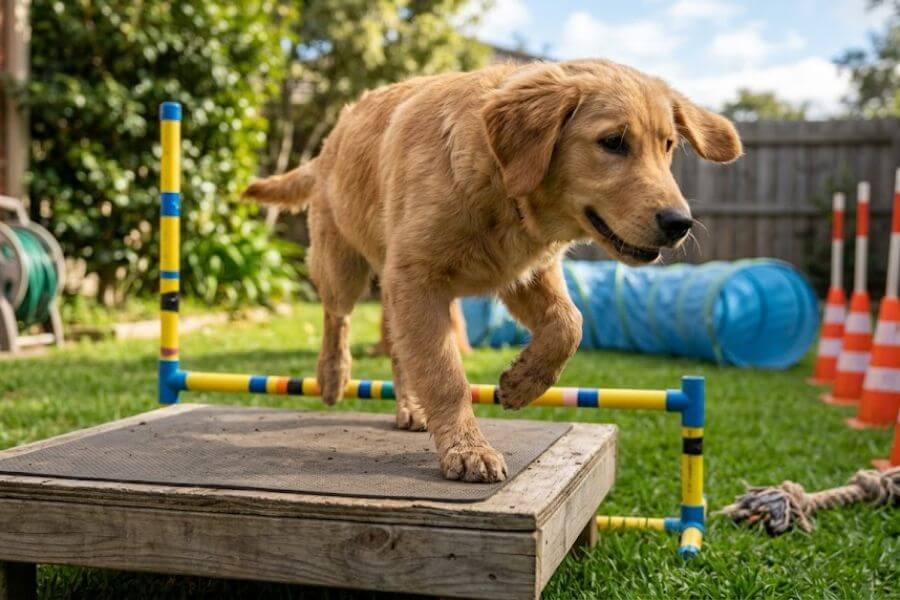
To build a safe, adjustable PVC jump, you will need two long vertical pipes for the sides, two shorter horizontal pipes for the feet that rest on the ground, and one long bar for the top.
First, create two stable bases. You can do this by connecting two short pieces of pipe to a T-shaped joint so they lay flat on the ground, pointing forward and backward. Insert a long vertical pipe upward from that same T-shaped joint. This gives you two freestanding posts.
Next, you need a way to hold the jump bar. Instead of permanent brackets, you can use plastic snap-on jump cups, or you can simply screw small plastic plant clips onto the upright posts. Place these clips at various heights so you can change the difficulty as your dog learns. Finally, rest your long horizontal bar across the clips. Remember, it must be loose enough to drop if your dog touches it.
If you are using household items, simply flip two plastic laundry baskets upside down and rest a broomstick across them. You can weave the broomstick through the plastic holes of the baskets to adjust the height.
Introducing Your Dog to the Jump
When teaching this skill, start with the bar resting directly on the ground. Do not ask your dog to jump yet; simply encourage them to step over the bar. Walk alongside your dog on a loose leash and guide them across, rewarding them with a tasty treat the moment their paws cross the line.
Once your dog is completely comfortable stepping over the bar, raise it just two inches off the ground. Stand on the opposite side of the hurdle, hold a treat in your hand, and call your dog toward you. Use a cheerful cue word like “Jump!” or “Over!”
As soon as they hop over the low bar, praise them enthusiastically and hand over the reward. Repeat this process multiple times, slowly raising the bar over several days as your dog builds confidence and strength. Never raise the bar higher than your dog’s elbow height during the beginning stages.
Creating the Weave Poles
Weave poles are a true test of a dog’s coordination and flexibility. The goal is for your dog to slither in and out of a straight line of upright sticks, always entering with the first pole on their left side.
Building Your Weave Pole Set
A professional set of weave poles has a heavy metal base, but you can make a brilliant beginner version using materials that fit your space. For an outdoor backyard course, the absolute simplest method is using plastic garden stakes or vertical PVC pipes pushed directly into the soft grass. Space the poles exactly twenty-four inches apart. This specific distance is crucial because it gives your dog enough room to bend their body safely without straining their spine.
For an indoor course, you can take a long, flat wooden board and drill holes into it at twenty-four-inch intervals, then insert your plastic pipes into those holes. Alternatively, you can use a row of heavy, filled plastic soda bottles or traffic cones lined up down a long hallway. A beginner course should start with just four to six poles. Trying to teach a dog to navigate twelve poles right away is far too overwhelming.
The Channel Method for Training
Teaching a dog to weave can be tricky, but the channel method makes it highly intuitive. Instead of placing the poles in a perfectly straight line, set them up in two parallel rows, creating a narrow alleyway or “channel” down the middle.
Walk your dog down the center of this straight path. Because the poles are separated, your dog can walk straight through without bending their body, but they still get used to the feeling of poles passing along their sides. Give them a treat every time they walk from one end to the other.
Over the course of a few weeks, slowly move the two rows closer together, narrowing the channel. Your dog will naturally begin to wiggle their hips and shoulders to fit through the closing space. Eventually, the poles will form a single straight line, and your dog will be weaving like a pro without even realizing how the game changed.
Assembling the Agility Tunnel
Dogs absolutely love tunnels. It taps into their natural instinct to explore dark, cozy spaces, and bursting out of the other end at top speed brings them immense joy.
Finding or Making a Safe Tunnel
The easiest way to get a tunnel is to use a collapsible fabric play tunnel made for young children. These are lightweight, affordable, and fold up flat for easy storage. If you want to make a temporary one using what you have at home, place a row of high-backed kitchen chairs side-by-side, then drape a heavy bedsheet or blanket over the top to create a long, dark canopy.
Safety is vital here: the tunnel must be secured so it does not roll around while your dog is inside. A rolling tunnel can terrify a dog and make them refuse to ever enter it again. You can secure a fabric tunnel by placing soft, heavy sandbags or large bags of dog food on either side of the entrance and exit to hold the structure firmly in place.
Guiding Your Dog Through the Darkness
Never force or push your dog into a tunnel. If they are afraid, forcing them will only deepen their fear. Instead, compress the fabric tunnel so it is incredibly short, like a giant donut. Your dog should be able to see right through to the other side easily.
Have a family member or friend hold your dog gently at one end of the short tunnel. Walk to the other end, kneel down, and look through the opening. Call your dog’s name in an excited voice while holding a high-value treat or their favorite squeaky toy.
When your dog takes a single step through the short hoop to reach you, celebrate like they just won a gold medal. Once they are happily running through the short version, gradually extend the tunnel to its full length. You can eventually add a slight curve to the tunnel to make the game more exciting.
Crafting the Pause Table or Box
In the middle of a high-speed agility run, dogs are suddenly required to stop completely and stay still for five consecutive seconds. This obstacle tests their emotional control and ability to listen when their adrenaline is pumping.
Constructing the Pause Area
In official competitions, this is an elevated wooden platform called a pause table. At home, you can easily use a sturdy, low wooden coffee table, a flat storage trunk, or a secure step-stool, provided it has a non-slip surface. If the surface is smooth, tape a rubber bathmat to the top so your dog does not slip when landing.
If you have a large breed dog and do not have a piece of furniture that can safely support their weight, you can create a pause box instead. Simply lay four PVC pipes on the ground to form a perfect square, or use brightly colored duct tape to outline a square directly on your carpet or grass. The rule remains the exact same: your dog must enter the square and stay inside its boundaries.
Practicing the Five-Second Freeze
Guide your dog onto the table or into the square using a treat. Once all four of their paws are safely inside the zone, ask them to sit or lie down. Give them a treat immediately for getting into position.
Now comes the challenging part: counting down from five. Dogs want to keep running, so staying still is hard work. Count out loud: “One, two, three, four, five.” If your dog stays in place, give them a jackpot reward of multiple treats and use a release word like “Okay!” or “Free!” to let them know they can leave the zone. If they break position before you hit five, simply guide them back into the square and try again, starting with just a two-second countdown and building up over time.
Designing the Tire Jump
The tire jump is a variation of the hurdle, but instead of jumping over a bar, your dog must leap through a suspended circular target. This requires great spatial awareness, as they cannot see the ground directly beneath the opening.
Building a Safe Tire Obstacle
You do not need a real, heavy rubber car tire for this project. A real tire is far too heavy and can seriously hurt your dog if they strike it mid-air. Instead, purchase a bright plastic hula-hoop or a flexible foam pool noodle. If you use a pool noodle, bend it into a perfect circle and connect the two ends using duct tape.
To suspend the hoop, build a simple rectangular PVC frame consisting of two vertical legs and a top crossbar. Use sturdy zip-ties or pieces of rope to hang the hoop inside the frame. Make sure to secure the hoop at both the top and the bottom so it does not swing like a pendulum when your dog tries to jump through it. Just like the regular jump, ensure the connections can break free if your dog hits the frame with significant force.
Target Training Through the Circle
Just like the hurdle jump, start with the tire extremely low, touching the ground. Stand on one side of the hoop while your dog stands on the other. Hold a treat directly through the center of the opening so your dog can see it.
Do not allow your dog to walk around the outside of the frame. If they try to circumvent the hoop, gently guide them back to the start. Use your cue word, such as “Tire!” or “Through!” and lure them directly through the circle.
Because the hoop is low, they will simply step through it at first. Reward them immediately. Once they understand that the goal is to pass through the center of the circle, elevate the hoop a few inches off the ground so they must perform a joyful hop to get to the other side.
Creating Your First Course Layout
Once your dog has mastered each individual obstacle, it is time to connect them into a complete course. Designing the layout is where you can truly let your creativity shine.
The Flow of the Course
When arranging your home course, look at how the obstacles line up. A good beginner layout should have a natural, logical flow with wide, gentle turns. Avoid placing obstacles at sharp ninety-degree angles from one another, as tight turns are very difficult for a beginner dog to navigate safely.
Start by placing three obstacles in a straight line, such as a jump, followed by a tunnel, followed by another jump. Running in a straight line allows your dog to build up speed and maintain forward momentum, which makes the activity incredibly fun for them. As they become more advanced, you can arrange the obstacles in a large circle or an S-shaped pattern around your yard.
Sample Beginner Layout Grid
Here is an excellent, straightforward arrangement to try in your yard or large living space.
- Station One: A low hurdle jump to start the run with a burst of energy.
- Station Two: A straight, ten-foot fabric tunnel placed fifteen feet after the first jump.
- Station Three: The tire jump, positioned gently to the right after the tunnel exit.
- Station Four: The pause table or box, where your dog must stop their momentum and freeze for five seconds.
- Station Five: A final set of four weave poles to finish the run with focus and precision.
The Art of Handling and Communication
Many people believe that agility training is all about teaching the dog, but the reality is that the human partner needs just as much practice. Your dog looks to you for clues on where to go next. If your body language is confusing, your dog will end up running to the wrong obstacle.
Body Language and Positioning
Your shoulders always point toward where you want your dog to go. If you are facing a jump but looking over your shoulder at the next obstacle, your dog will often follow your chest direction and miss the turn. Keep your body moving forward in the direction of the desired path.
Use the hand closest to your dog to guide them. If your dog is running on your left side, use your left arm to point clearly at the next obstacle. Keep your hand low, around the level of your dog’s nose, as if you are leading them with an invisible leash. Avoid waving your arms frantically, as this can confuse your pet or make them think you are playing a wild game of tag.
Clear and Timely Verbal Cues
Consistency is key when using verbal commands. Decide on a specific, short word for each obstacle and stick to it. For example, use “Jump” for hurdles, “Tunnel” for tubes, “Weave” for poles, and “Table” for the pause platform.
You must give the command before your dog reaches the obstacle, not when they are already arriving at it. Dogs move fast. If you wait until they land from a jump to tell them to enter the tunnel, they will likely overshoot the entrance. Give your command two or three strides ahead of time so your dog has a moment to process the information and adjust their footing.
Keeping Training Sessions Fun and Positive
Agility should never feel like a chore or a strict school lesson for your dog. It must feel like the absolute best game of the day. If you or your dog are feeling frustrated, it is time to pack up the gear and try again later.
The Power of High-Value Rewards
Do not use your dog’s ordinary dry kibble for agility training. They need something truly extraordinary to motivate them to work hard and try new things. Use tiny, pea-sized pieces of cooked chicken, cheese, hot dogs, or specialized soft training treats that smell amazing.
If your dog is motivated by toys rather than food, use a special tug-toy or a tennis ball that is only brought out during agility sessions. This keeps the toy incredibly exciting and valuable in your dog’s eyes.
Keeping Sessions Short and Sweet
Dogs have short attention spans, and agility is physically exhausting. A training session should only last between five and ten minutes. It is far better to do two or three super short, highly successful sessions throughout the day than one long, exhausting thirty-minute session. Always end your training session on a high note, right after your dog performs an obstacle perfectly. This leaves them excited and eager for the next time you bring out the course equipment.
Frequently Asked Questions
Can small toy breeds do agility training?
Yes, absolutely. Smaller dogs like Chihuahuas, Pomeranians, and Shih Tzus make fantastic agility partners. They are often incredibly nimble and can turn much faster than giant breeds. When building a course for a toy breed, keep the jump bars very low to the ground, usually around two to four inches, and ensure your tunnel is not too dark or overwhelming for their small size.
What should I do if my dog is terrified of the tunnel?
Never push your dog inside. If they hesitate, go back to the absolute beginning step. Make the tunnel as short as a single fabric ring and use a highly appealing treat to entice them through. You can also try feeding your dog their regular meals right next to the entrance of the tunnel so they begin to form a positive association with the object.
How old does my puppy need to be to start jumping?
Puppies should not do any high jumping or sharp twisting movements until their growth plates are fully closed, which typically happens between twelve and eighteen months of age, depending on the breed. However, you can start training a puppy as early as eight weeks old by focusing on flatwork. This means teaching them to run between upright posts, step over bars laying flat on the grass, and walk through short, straight tunnels.
My dog keeps running past the jumps instead of over them, how do I fix this?
If your dog is running around the side of an obstacle, it usually means the jump is too high or your body language is directing them away. Lower the bar significantly to make it inviting. You can also place lawn chairs or solid boxes on either side of the jump to create a temporary wall, forcing them to look at the center path. Walk directly through the jump with them on a leash a few times to show them exactly what you want.
Do I need a large backyard to build an agility course?
You do not need a massive yard at all. A single car garage, a basement, or even a long living room is plenty of space to set up a mini course consisting of a single jump, a short tunnel, and a set of weave poles. Focus on practicing one or two skills at a time rather than trying to fit a massive, full-scale course into a confined living space.
Can I do agility training with a dog that does not know basic commands?
It is highly recommended that your dog knows at least two basic commands before starting agility: “Sit” and “Stay.” A reliable sit-stay is crucial at the starting line of a course, allowing you to walk ahead and get into position before calling your dog forward. It also makes teaching the pause table a much smoother process.
What is the best way to clean and store homemade PVC equipment?
PVC pipes are incredibly durable and weather-resistant, but they can become brittle if left out in the direct, freezing cold or intense summer sun for months at a time. Wipe down your plastic pipes with a damp cloth and mild soap to remove dirt and grass stains. Since PVC structures are lightweight, you can easily snap them apart and store them in a large plastic bin or a sports duffel bag in your closet or garage.